Custom window title and (almost) correctly drawing Windows 10 borders
A few weeks ago I wanted to try and replace the default Windows title bar of one of my program with a custom title bar (also called caption area or window chrome). Like how browsers tabs are at the top most position in the window. This was supposed to be a quick thing, but ended up being more difficult than expected when the window border color, shadow, maximizing animation and probably other things I forgot about didn't work correctly.
Short version
- The part about drawing the top window border is for Windows 10, as my understanding is that Windows 11 correctly draws borders for you.
- I don't have a Windows 11 capable machine, so none of this was tested on it.
- To do custom title bar and keep default window borders, you need to handle
WM_NCCALCSIZEandWM_NCHITTESTmessages; - In
WM_NCCALCSIZEyou need to subtract the window "resize border" on the left, right and bottom. Don't touch the top border unless the window is maximized. - In
WM_NCCALCSIZEonly when the window is maximized do you need to remove the "resize border" from the top. - If you want to start your application maximized, and have the maximized animation work correctly, you need to disable the NC rendering during the animation, and re-enable it before any of the NC area become visible again (e.g. when the window is restored). This is only when starting maximized. After that or if you don't start maximized it works properly.
// To disable:
int val = DWMNCRP_DISABLED;
DwmSetWindowAttribute( window, DWMWA_NCRENDERING_POLICY, &val, sizeof( val ) );
// To enable:
int val = DWMNCRP_ENABLED; // DWMNCRP_USEWINDOWSTYLE ?
DwmSetWindowAttribute( window, DWMWA_NCRENDERING_POLICY, &val, sizeof( val ) );
- [Only for Windows 10 ?] If you want to have the correct border color (including when the user sets the accent color in the color settings), you need to enable "immersive dark mode", extend the window frame into the client area for the size of the border at the top, and draw a border color that will get blended with the background.
- When the window is maximized you don't need to draw the border;
- Extending the window frame into the client area allows the DWM to draw the border (sort of);
DwmExtendFrameIntoClientArea( window, &( MARGINS ) { 0, 0, 1, 0 } );
- When the window is active, you draw a black transparent border at the top (RGBA of 0, 0, 0, 0) to use the border from the DWM.
- When the window is inactive, you draw a gray semitransparent border. The exact color is:
float gray = roundf( 85.0f * 0.5f ) / 255.0f;
float alpha = 0.5f;
// RGBA (gray, gray, gray, alpha)
- The requirement for the dark mode is because there seems to be a bug (it might be intended behavior but I'll call it a bug) where if you extend the frame into the client, when using the light mode, the window border becomes pure white. The color you'll get from the dark mode are slightly different, but close enough in my opinion.
BOOL value = TRUE;
DwmSetWindowAttribute( window, DWMWA_USE_IMMERSIVE_DARK_MODE, &value, sizeof( value ) );
- To keep the taskbar above your window when it's maximize and taskbar auto hide is enabled:
SetPropW( window, L"NonRudeHWND", ( HANDLE ) TRUE );
A month to draw a single line
A month ago, when I started on the path to draw a custom title bar, I knew that Allen Webster wrote an example file that explained it. I read it in the past, and remembered that is seemed quite simple.
Mr. 4th | Win32 Custom Window Border
Most of the things covered in that code sample will not be covered here, so I recommend reading Allen's code and comments for more details. The bulk of it is that you need to handle WM_NCCALCSIZE and WM_NCHITTEST messages in your window loop. It may be a good time to indicate that this article will not try to handle Windows 7 and wasn't tested on Windows 11. The support for Windows 10 ends in 2 weeks, so I'm, at most, fixing paint on a sinking ship.
Allen's example shows how to get control over the full Window rectangle. If you run their code, you might notice that we "lost" some of the feel of a standard window. I say might, because I'm guessing most people won't notice it unless pointed to it. The first things that was off for me is that the resize handles are inside the window frame. The second thing is that the window doesn't have a shadow surrounding it.
Other mainstream applications have a similar approach, which means it's a valid approach. For example Steam, Discord or Epic Game Store have the resize handles "inside the window". But they have the shadow surrounding shadow. I didn't know at the time, but if you want the shadow you just need to extend the window frame into the client area. The reason that works is, I'm guessing here, that "Windows" has metrics about how much of the window frame (or non client area as we will see) is possibly visible, and if any of it is visible, will draw the shadow.
DwmExtendFrameIntoClientArea( window, &( MARGINS ) { 0, 0, 1, 0 } );
I'll cover a little bit more details later about that function. For the moment, know that which side or by how much of the frame you extend doesn't matter as what you'll draw in the window will cover it, unless you draw transparent colors.
My goal was to keep the standard window feel and File Pilot seemed to do hit properly. So I asked Vjekoslav Krajačić how they did it. They shared their WM_NCCALCSIZE and WM_NCHITTEST code and told me they weren't doing anything special for the shadow. After looking at their code I was confused. They also pinged Ryan Fleury because they had some issue with it at some point, and advised me to look at the Rad Debugger Project sources.
The Rad source for WM_NCCALCSIZE made sense, and lead us to see that File Pilot's code was "incorrect" (as much as incorrect code that produce the correct result is incorrect). File Pilot was modifying the rectangle wrong, but passing it to DefWindowProc afteward which modified it to the correct value.
Here is an example of how to do it properly. A fully working example of the content of the article is available at the bottom. If you're not familiar with win32 rectangles, the origin is the top left corner, and y down is positive.
case WM_NCCALCSIZE: {

    /* NOTE simon (27/09/25): Need to handle DPI settings. GetSystemMetricsForDpi */
    int padding = GetSystemMetrics( SM_CXPADDEDBORDER );
    int borderLR = GetSystemMetrics( SM_CXFRAME ) + padding;
    int borderTB = GetSystemMetrics( SM_CYFRAME ) + padding;

    RECT* rect = 0;

    if ( wParam ) {
        rect = ( ( NCCALCSIZE_PARAMS* ) lParam )->rgrc;
    } else {
        rect = ( RECT* ) lParam;
    }

    rect->left += borderLR;
    rect->right -= borderLR;
    rect->bottom -= borderTB;

    if ( IsZoomed( window ) ) {
        rect->top += borderTB;
    }

} break;
With all that, I could make sens of it, but it showed some peculiarities of how windows in Windows work.
Anatomy of a window
A window, in the context of this article, is composed of two parts: the client area, and the non client area. You'll often see "NC" appears in the win32 API, for example WM_NCCALCSIZE or WM_NCHITTEST. NC stands for Non Client.
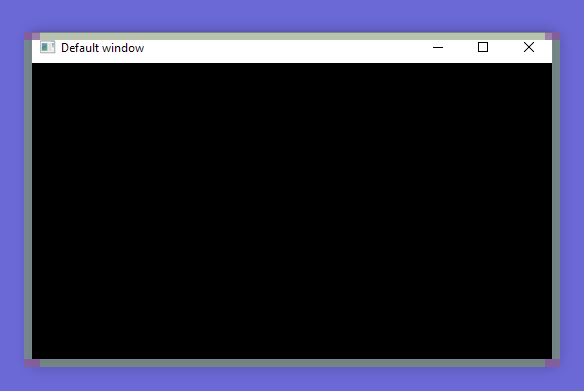
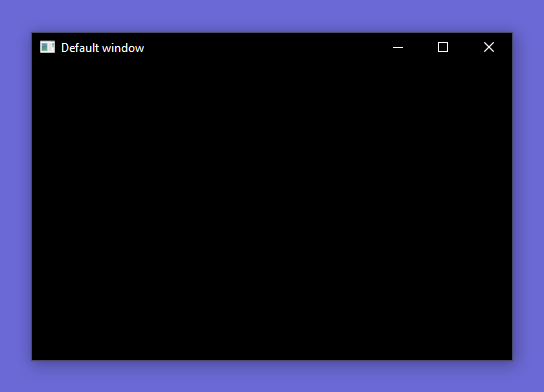
The client area is the part of the window where we can draw stuff in. In the following screenshot the client area is the black rectangle under the title bar. The client area is often called "client rect" in win32 APIs.

The non client area is the part of the window that "Windows" draws for us. It contains the title (caption) bar with the system menu icon, the title, the minimize, maximize/restore and close buttons. It also contains the resize borders, which are "invisible" in the screenshot. On windows 10 (and 11 ?) the resize borders are "outside" the visible area of the window, for the left, right and bottom. You can see that if you move you mouse slowly near the border at which point the cursor will change to a "resize arrow". The top resize border, is inside the visible area of the window (inside the title bar). The non client area, doesn't "contain" the client area, but we often want to talk about the big rectangle that contains both the client area and non client area. In the win32 APIs it is called the "window rect".
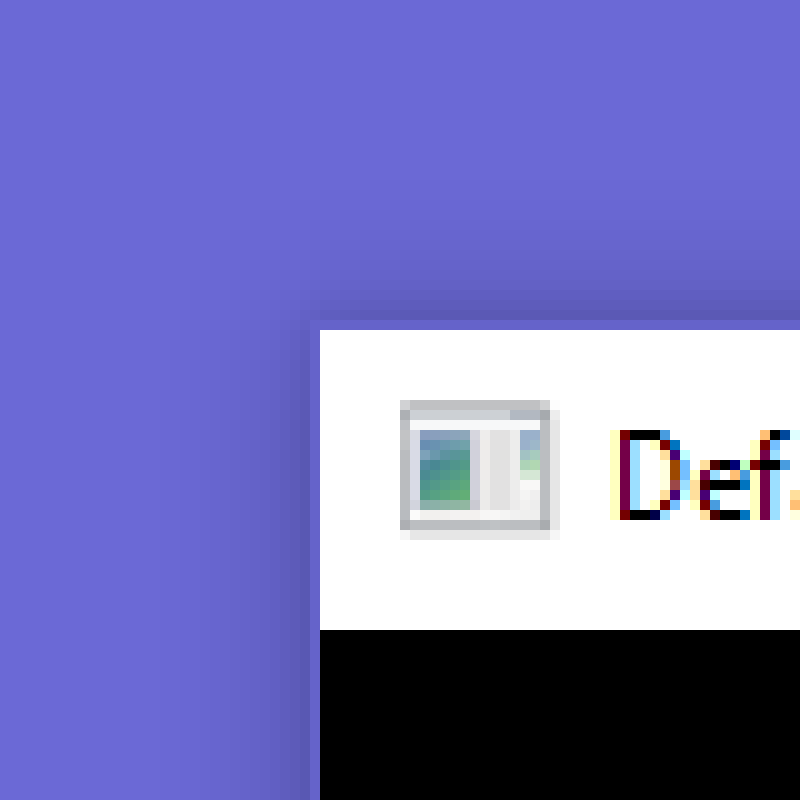
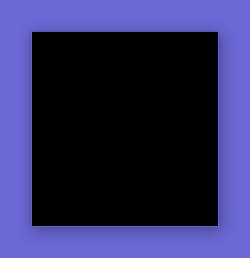
In this screenshot you can see the resize border highlighted in light green. You can see also in the corners red regions, which are the regions that resize on both x and y. And those regions are not squared, which I'd never noticed.
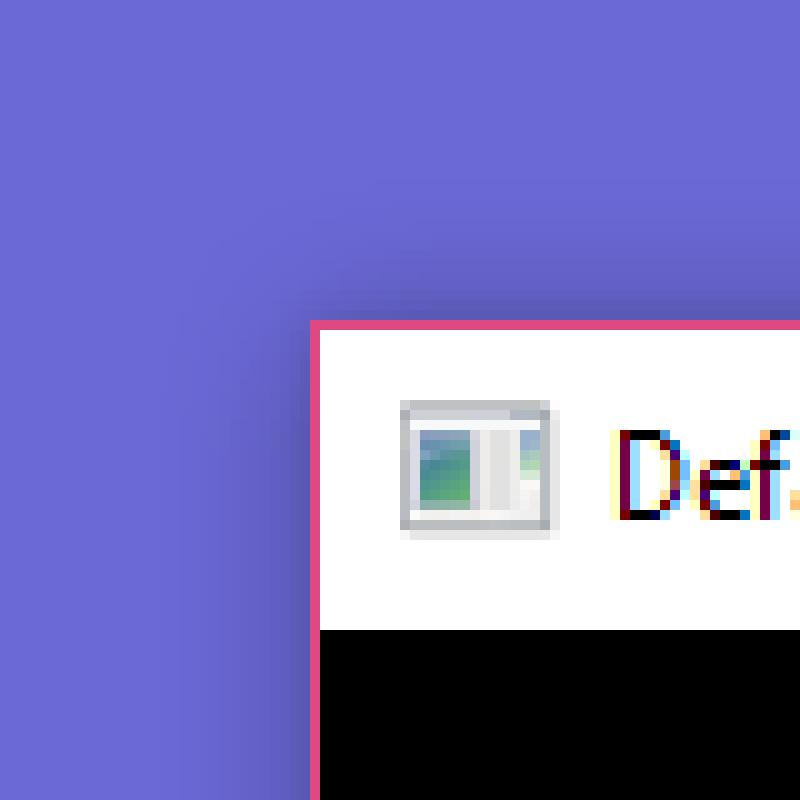
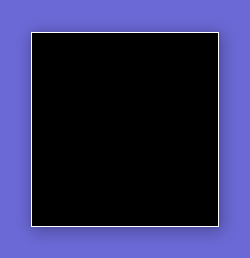
If we zoom on a corner, we can see that "outside the window" there is small border. Highlighted in pink in the next screenshot. That border is part of the resize handle. That border can also be colored to the user preference if they choose an accent color in the windows settings and enable it for the title bar and window borders. It's in the same settings panel as the light and dark mode setting.
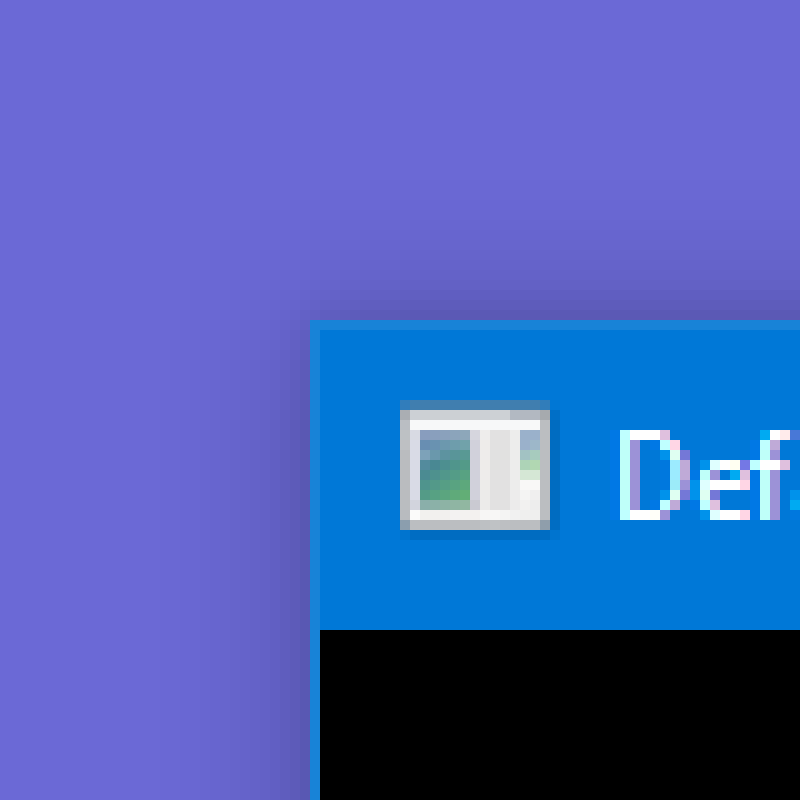
Here is the same window in dark mode.
One peculiarity of Windows is that, by default, it will not draw dark mode title bars and borders. If an application handles dark mode, it needs to check if the user enabled dark mode, and then asks the DWM to draw the NC area in dark mode. The documentation says that the setting for dark mode is only available for some versions of Windows 11 (DWMWA_USE_IMMERSIVE_DARK_MODE) but after trying it, it works for Windows 10.
Light and dark mode borders are slightly different colors when the window has the focus. It's a detail but it'll save us at some point. When the window doesn't have the focus, the border color is always the same. Those borders are semi transparent except when accent colors are enabled and the window has the focus.
As far as I can tell the shadow is the same independently of the mode. It changes when the window gets or lose the focus. Without the focus, the shadow is 14 pixels on each sides (I included the border in that number), and with the focus, it has different size on each sides: 17 at the top, 22 on the right, 23 on the bottom and 18 on the left (also including the border). Note that those number might be slightly off, they are just an indication.
A quick note about DPI. I didn't try to handle DPI settings, so every number in this articles are based on my measurement on a 1080p monitor.
The border size in my case is 1px wide, it might be bigger with high DPI settings. The resize handles are 8px wide (the code sample above for WM_NCCALCSIZE has a comment with the DPI aware function). We'll not use it but for reference the caption height is 23px, and when combined with the resize handle is 31px. This is the size of the standard title bar.
Previously I said "Windows" draws the non client area. Let's try to be a bit more precise, but keep in mind that I'm not 100% sure about this. My understanding is that the part of the OS that draws the NC area is the Desktop Window Manager (DWM). That means that your application (or process) is never drawing in the NC area at all. When we extend the frame into the client area we are still only drawing inside the client area, but the DWM also "draws behind" the client area. As far as I can tell, when the DWM wants to present your application to the screen, it composes what you rendered with it's own rendering to make the final image you see.
If I'm correct, you can think of it as: you draw something in a buffer that is the size of the client area, the DWM renders in a buffer that is the size of the window, possibly drawing in an area that overlaps the client area (if we extended the frame), and then blends your buffer on top of its buffer.
Making the client area cover the relevant part of the window area
What does the WM_NCCALCSIZE sample above do ? Here is the important part again.
rect->left += borderLR;
rect->right -= borderLR;
rect->bottom -= borderTB;

if ( IsZoomed( window ) ) {
    rect->top += borderTB;
}
When processing this message, you're asked to transform the input rectangle, which is the window rectangle (NC area + client area), into what you'd like the client rectangle to be. We want to keep the borders in the NC area to keep them invisible and have the default border drawn by the DWM. That works for the left, right and bottom resize handle. But as shown above, the top resize handle is "inside the visible part of the window", so we want to keep that. And so we don't modify the rectangle top.
There is a small difference when the window is maximized: in that case the window rectangle will extend past the sides of the screen, by the resize handle size. On all sides, including the top. So when the window is maximized, we also modify the top of the rectangle.
If you run that code it might seem that everything is fine.
If you are using Windows 11, it should be fine. You can skip to the last part of the article, where I'm not talking about borders anymore. You're lucky.
Otherwise, if you zoom on the top of the window, you'll see that the top border is missing. If you enable accent colors, it will be obvious.

Remember that that border is (visually) part of the top resize handle, and now our client area covers it. In addition, if you call DefWindowProc for the WM_NCHITTEST message to get the default behavior for the resize handle, it won't work. The default behaviour seems to rely on the difference between the NC and client area, and now the difference is 0. The other handles still work, only the top one doesn't work. Having to handle the top resize handle ourselves was expected, so it's OK.
I don't know where to talk about this, but there is DwmDefWindowProc which you can call to do the default hit test in WM_NCHITTEST for the caption buttons (minimize, maximize/restore, close). This allows the DWM to render the buttons properly, for example turn the close button red when you hover it. You shouldn't use it in this case as we will draw the buttons ourselves (not in this article), and I had issues where the mouse cursor would switch from the resize arrow to the standard arrow on the top pixel of the window in some case. I didn't exactly understood what was happening, but removing the call to that function solved the issue. It seemed to be related to not extending the frame enough to contain the buttons.
Back to the top border being covered by our drawing in the client area. We could leave a pixel at the top as we do for the other borders, except the other borders need 8 pixels. Let's try that.
rect->left += borderLR;
rect->right -= borderLR;
rect->bottom -= borderTB;
rect->top += 1;

if ( IsZoomed( window ) ) {
    rect->top += borderTB;
}

Not what I expected. It seems that something in the DWM detects that the client area doesn't cover the entirety of the caption, and decides to draw a caption bar and buttons (note that the caption is 23 pixels tall). In the following video you can see that the caption is outside the window rectangle. Not outside the client rectangle, outside the window rectangle. If you try to click the caption, only the very bottom pixel of it will work, other "pixels" will just click through to whatever is behind.
So the client area top, needs to align perfectly with the NC area top. At that point I tried to look online to see how to properly do it, but couldn't find a satisfying result. Everything seemed to indicate that it wasn't possible.
I decided to look at application that seemed to do it properly. I'll take Firefox as an example. When accent color aren't enabled, they just don't have a border at the top. When accent colors are enabled, they draw an opaque border with a color close to the accent color (but not exactly it). When the window doesn't have the focus they draw an opaque border with the color depending on the light/dark theme (I think).
I looked at the settings window of Windows. The window that let you choose color, light or dark theme also fakes it. But I don't exactly know how they do it but they get a semitransparent border color. Not quite the correct color though.
Trying to fake it
At that point I was convinced there was no way to do it properly, and that I should try to fake it. I tried to create a transparent window using SetLayeredWindowAttributes and UpdateLayeredWindow expecting to be able to create the transparent border that way.
SetLayeredWindowAttributes is easy to use but only lets you draw the whole window, title bar included, with some alpha value; or choose a color that will be considered fully transparent, for example if you choose red, all pixel that are red in the window will be fully transparent. So it doesn't help.
UpdateLayeredWindow I couldn't use it to do what I wanted. There were several issues, I don't remember all of it, but it needs to use device contexts, you need to create a DIBSection, and using the WS_OVERLAPPEDWINDOW style made the window have rounded corners at the top. Also the doc says the pSize parameter is optional but in my test if you don't pass it, your window will disappear (is it fully transparent ?).
One thing to note is that those API indicates that the colors must be pre-multiplied with the alpha value. I'm grateful that my brain decided to keep that information as it became helpful later.
So I focused on drawing an opaque border with the a color that would be OK-ish. Since the real border are semitransparent you can't find a color that is always correct. Except when using accent colors, because in that case the border is opaque. Processing the WM_DWMCOLORIZATIONCOLORCHANGED message gives you a color that is close but not quite the accent color. And we don't want the accent color, we want the border color derived from it. So I searched how to find that color, and found this github repository: Windows10Colors.
It shows how to get the color using an API or by looking in Windows registry. The color we get is the accent color, which is the title bar color, and is slightly different from the border color. Their code shows how to get the correct border color from the accent color. It's a linear interpolation with a fixed color, using a blending factor that, as far as I know, is only available in the registry. You also need to round the result, not just truncate, to get the correct value. The registry is also the only way to know if the accent colors are enabled.
void get_colors_from_registry( void ) {

    HKEY key = 0;
    LSTATUS status = RegOpenKeyExW( HKEY_CURRENT_USER, L"SOFTWARE\\Microsoft\\Windows\\DWM", 0, KEY_READ, &key );
    assert( status == ERROR_SUCCESS );

    DWORD size = sizeof( DWORD );

    DWORD frame_color = 0;
    status = RegGetValueW( key, 0, L"ColorizationColor", RRF_RT_REG_DWORD, 0, &frame_color, &size );

    DWORD balance = 0;
    status = RegGetValueW( key, 0, L"ColorizationColorBalance", RRF_RT_REG_DWORD, 0, &balance, &size );

    status = RegGetValueW( key, 0, L"ColorPrevalence", RRF_RT_REG_DWORD, 0, &g_use_accent, &size );
    assert( status == ERROR_SUCCESS );

    status = RegCloseKey( key );
    assert( status == ERROR_SUCCESS );

    if ( g_use_accent ) {

        DWORD frame_blend_color = 0x00d9d9d9;

        float factor_a = ( ( float ) balance ) / 100.0f;
        float factor_b = ( ( float ) ( 100 - balance ) ) / 100.0f;

        float a_r = ( float ) ( ( frame_color >> 16 ) & 0xff );
        float a_g = ( float) ( ( frame_color >> 8 ) & 0xff );
        float a_b = ( float ) ( frame_color & 0xff );

        float b_r = ( float ) ( ( frame_blend_color >> 16 ) & 0xff );
        float b_g = ( float ) ( ( frame_blend_color >> 8 ) & 0xff );
        float b_b = ( float ) ( frame_blend_color & 0xff );

        int r = ( int ) roundf( a_r * factor_a + b_r * factor_b );
        int g = ( int ) roundf( a_g * factor_a + b_g * factor_b );
        int b = ( int ) roundf( a_b * factor_a + b_b * factor_b );

        g_border_color_active = ( b << 16 ) | ( g << 8 ) | ( r );

    } else {

        g_border_color_active = 0xb2323232;
    }
}
Note that if we don't use the accent color I set the color to some value. This value isn't particularly good, I don't remember exactly why I choose that exactly. As for the color we are blending with, 0x00d9d9d9 it was in the repository I linked above, but I also spent some time finding it myself, because the way I was blending the values didn't give me the exact result I was looking for, so I tried several values. It turns out I wasn't rounding correctly. I also took screenshots of every accent colors listed in the settings, as well as the resulting border colors to verify that I was getting the correct result in the end. I'll have the colors and corresponding border colors at the bottom of the article just in case somebody needs that.
The other way to access the accent color, is to use the UI View Management API. Which has very nice and easy to type function names when you want to use them in C. It's also completely obvious how one would use them, and doesn't take several hours of research. That would be silly. We don't need this if we read the registry, but maybe this knowledge will be useful later ?
/* Compile with
cl accent.c /nologo /Zi /Od runtimeobject.lib
*/

#define COBJMACROS
#define INITGUID
#include <initguid.h>
#include <assert.h>
#include <roapi.h>
#include <windows.ui.viewmanagement.h>

/* NOTE simon (02/09/25):
Those GUID are declared as extern in

"C:\Program Files (x86)\Windows Kits\10\Include\10.0.22000.0\winrt\windows.ui.viewmanagement.h".

But I couldn't find a way to get the actual symbol, so I used __uuidof in Cpp to get the value. */

/* IID___x_ABI_CWindows_CUI_CViewManagement_CIUISettings2 85361600-1c63-4627-bcb13a89e0bc9c55 */
DEFINE_GUID( IID___x_ABI_CWindows_CUI_CViewManagement_CIUISettings2, 0x85361600, 0x1c63, 0x4627, 0xbc, 0xb1, 0x3a, 0x89, 0xe0, 0xbc, 0x9c, 0x55 );
/* IID___x_ABI_CWindows_CUI_CViewManagement_CIUISettings3 3021be4-5254-4781--81945168f7d06d7b */
DEFINE_GUID( IID___x_ABI_CWindows_CUI_CViewManagement_CIUISettings3, 0x3021be4, 0x5254, 0x4781, 0x81, 0x94, 0x51, 0x68, 0xf7, 0xd0, 0x6d, 0x7b );

int main( int argc, char** argv ) {

    /* NOTE simon (02/09/25):
    RoInitialize is similar to CoInitialize.
    If you call both, you need to pass the same concurrency model to it.
    If you called CoInitialize before calling RoInitialize, RoInitialize will return S_FALSE, meaning it's already initialized.
    You could call CoUninitialize before if you don't need COM anymore.
    Ro is "Runtime object".
    */

    HRESULT result = RoInitialize( RO_INIT_SINGLETHREADED );
    assert( result == S_OK );

    HSTRING_HEADER header = { 0 };
    HSTRING hstring = { 0 };

    /* NOTE simon (09/09/25): Use the default interface and then query the other version from it. */
    result = WindowsCreateStringReference( RuntimeClass_Windows_UI_ViewManagement_UISettings,
                                          wcslen( RuntimeClass_Windows_UI_ViewManagement_UISettings ), &header, &hstring );
    assert( result == S_OK );

    __x_ABI_CWindows_CUI_CViewManagement_CIUISettings* settings = 0;
    result = RoActivateInstance( hstring, ( IInspectable** ) &settings );
    assert( result == S_OK );

    __x_ABI_CWindows_CUI_CViewManagement_CIUISettings3* settings_3 = 0;
    result = IInspectable_QueryInterface( settings, &IID___x_ABI_CWindows_CUI_CViewManagement_CIUISettings3, &settings_3 );
    assert( result == S_OK );

    __x_ABI_CWindows_CUI_CColor color = { 0 };

    /* NOTE simon (09/09/25): This is were you get the color. */
    result = __x_ABI_CWindows_CUI_CViewManagement_CIUISettings3_GetColorValue( settings_3, UIColorType_Background, &color );
    result = __x_ABI_CWindows_CUI_CViewManagement_CIUISettings3_GetColorValue( settings_3, UIColorType_Foreground, &color );
    result = __x_ABI_CWindows_CUI_CViewManagement_CIUISettings3_GetColorValue( settings_3, UIColorType_AccentDark3, &color );
    result = __x_ABI_CWindows_CUI_CViewManagement_CIUISettings3_GetColorValue( settings_3, UIColorType_AccentDark2, &color );
    result = __x_ABI_CWindows_CUI_CViewManagement_CIUISettings3_GetColorValue( settings_3, UIColorType_AccentDark1, &color );
    result = __x_ABI_CWindows_CUI_CViewManagement_CIUISettings3_GetColorValue( settings_3, UIColorType_Accent, &color );
    result = __x_ABI_CWindows_CUI_CViewManagement_CIUISettings3_GetColorValue( settings_3, UIColorType_AccentLight1, &color );
    result = __x_ABI_CWindows_CUI_CViewManagement_CIUISettings3_GetColorValue( settings_3, UIColorType_AccentLight2, &color );
    result = __x_ABI_CWindows_CUI_CViewManagement_CIUISettings3_GetColorValue( settings_3, UIColorType_AccentLight3, &color );
    /* NOTE simon (09/09/25):
    This value isn't supported (it says so in the doc).
    result = __x_ABI_CWindows_CUI_CViewManagement_CIUISettings3_GetColorValue( settings_3, UIColorType_Complement, &color );
    */
    assert( result == S_OK );

#if 0
    /* NOTE simon (09/09/25):
    You don't need this, I left it as an example, but what you get here isn't useful.
    Some of the values seems to be similar to GetSysColor for which most values aren't supported anymore.
    The UIElementType enum seems to be split in two ranges: (value are 0 -> 12, and then 1000 -> 1012).
    The accent color is value 1000, but it returns (0,0,0) for me.
    */
    __x_ABI_CWindows_CUI_CViewManagement_CIUISettings* settings_2 = 0;
    result = IInspectable_QueryInterface( settings, &IID___x_ABI_CWindows_CUI_CViewManagement_CIUISettings2, &settings_2 );
    assert( result == S_OK );

    result = __x_ABI_CWindows_CUI_CViewManagement_CIUISettings_UIElementColor( settings_2, UIElementType_AccentColor, &color );
    assert( result == S_OK );
#endif

    return 0;
}
So now we have one exact color: when the user has the accent color enabled and the window has the focus. In all other cases we pick a color and hope it's close enough. I didn't even know at the time that light and dark mode used different border colors. For several days, I tried finding colors that would work most of the time. At some point I looked a bit more at what DwmExtendFrameIntoClientArea does, and found Custom Window Frame Using DWM.
What is the use for DwmExtendFrameIntoClientArea
I used DwmExtendFrameIntoClientArea a few times but never understood what it did. The doc isn't very specific on how to properly use it. When I did, whatever was in the region it extended the frame in had weird colors. The article about custom frame linked above explains it with more detail.
The main thing is, if you want to see the actual frame and not alter it you need to render a transparent color in the corresponding area. If you use GDI, you just draw black RGB( 0, 0, 0 ), if you use OpenGL or another API you draw something with an alpha value of 0. If you use another alpha value, you will blend your client area with the DWM frame according to the alpha value. This was the reason I was getting weird color when testing using GDI to draw a border color. Some blending happened and it wasn't clear what was going on.
If, in addition to extending the frame into the client area, you also make the client area cover the title bar, you can have the standard title bar and draw things in it. That's how the Windows 10 file explorer has some additional buttons in its title bar. Another example is SumatraPDF, which as a sort of weird way of drawing its tab bar.
If we also draw an opaque color in all the client area except for the top pixel, we should have the top border show up correctly. Let's give it a try.
Why is there a white border around our window ? Why is the border normal when the window loses the focus ?
To me it looks like a bug. I can't say for sure, it might be the intended behavior. If you look at Windows file explorer it has the white border around it. I found later that in you ask the DWM to draw a dark title bar, you get a "correct" looking border. As pointed out earlier the border in dark mode are a slightly different color. Here is a comparison of the borders.
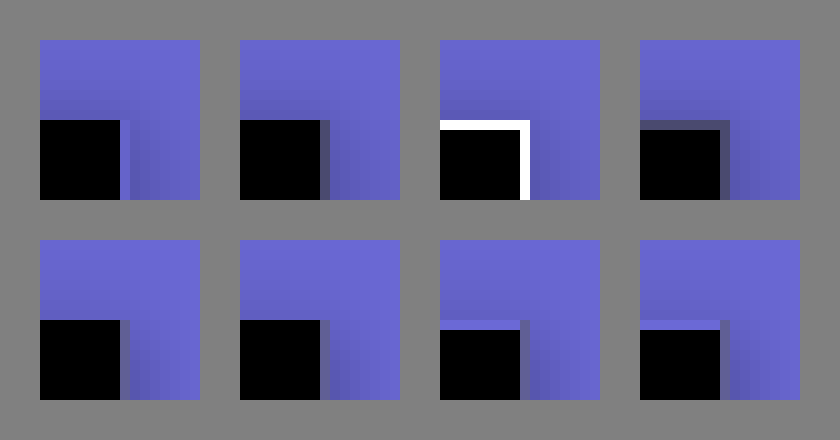
- The top row is when the windows has the focus.
- The bottom when it doesn't have the focus.
- The first two column don't call
DwmExtendFrameIntoClientArea. - The third and fourth column call
DwmExtendFrameIntoClientAreaand draw a pure transparent black RGBA (0, 0, 0, 0) border on the top pixel. - The first and third column use the light mode.
- The second and fourth column use the dark mode.
The image doesn't show when accent colors are enabled, but they are similar to the second and fourth column except the border uses the accent color on the top row.
The image shows a few things:
- The third image first row looks completely off. That is light mode with frame extended.
- First two columns show the color of the border we want to have at the top (light and dark mode).
- The bottom row shows that when the window doesn't have the focus the border is always the same.
- The third and fourth image of the second row show that when the window doesn't have the focus we have some extra work to get the correct border at the top.
- In the third and fourth image of the second row, the top border looks very close to the border of the first image first row. It's not exactly the same color, but it's close.
- Which makes me wonder if the color of the border in light mode is even correct in the first place. It's lighter than the shadow, which looks a bit off, but that's probably because of the black next to it. I'll consider that it's correct, as there is no way to know or change it if it's incorrect.
- The fourth column first row looks like a correct border ! That's dark mode with extended frame.
What is the closest we can get ?
Once again at that point I didn't knew that you could ask the DWM to draw dark mode title bar. I was trying to get accent color to work properly, which was very close as the only thing that didn't work is the border color when the window doesn't have the focus. I took screenshot in front of a black background and a white background, and did a bit of math assuming it was a simple linear blend.
// Border in front of black gives: 0x2b = 43
// Border in front of white gives: 0xaa = 170
// Linear blend: background * t + color * (1-t) = visible border color
0*t + x*(1-t) = 43
x*(1-t) = 43
x = 43/(1-t)

255*t + x*(1-t) = 170
255*t + (43/(1-t))*(1-t) = 170
255*t + (43(1-t))/(1-t) = 170
255*t + 43 = 170
255*t = 170 - 43
t = (170 - 43) / 255
t = 127/255 = 0.498039

// Lets assume it's 0.5 or 1/2

255/2 + x/2 = 170
255+x = 170 * 2
x = (170 * 2) - 255
x = 85

// So the color seems to be 85 or 0x55 and the interpolation factor 0.5
If we try to draw with that color and alpha we get:

Which isn't correct. But I remembered that when I tried to create transparent windows, the colors needed to be pre-multiplied. That means that instead of passing 85.0f/255.0f for R, G and B, we need to multiply it by the alpha: (85.0f * 0.5f)/255.0f. We also need to round it before normalizing: roundf( 85.0f * 0.5f ) / 255.0f.

Success ! We can handle the case that most user will never use: accent color enabled with or without the focus.
The common case
We now have the case where the user has accent colors enabled working exactly like it should. But the white border "bug", is messing up the more common case. At that point my solution was to not extend the frame when the window has the focus and accent color are disabled. In that case we would draw an opaque border and hope for the best. Drawing the same border color that we just computed seemed to work OK most of the time.
Then, a few days later, for some reason I thought that I'd check how to draw dark mode title bar. I found Support Dark and Light themes in Win32 apps in the Microsoft documentation. I tried to turn dark mode on without checking if it was enabled in the user settings.
BOOL value = TRUE;
DwmSetWindowAttribute( window, DWMWA_USE_IMMERSIVE_DARK_MODE, &value, sizeof( value ) );

It's working (this isn't the same screenshot as above, this is accent color off, dark mode on). We don't get a white border. The border isn't the correct color as seen previously, but it's better than the alternative. If I didn't read that article I probably wouldn't have tried to use dark mode, because once again, the doc says that the setting is only available in some versions of Windows 11.
So there we have it, spending a month to find that we just needed to enable dark mode, and draw a line to get the "correct" border.
The devil is in the details
Apart from remembering to draw the border only when the window isn't maximized, and by consequence not using the top pixel in the "client" part of the application. There are a few more details left.
That's a good one
You don't need to stop extending the frame when the window is maximized, as long as you draw something opaque there it won't show up.
Border color when the window gets the focus by clicking on the title bar
An issue left is that if you give the focus to the window by clicking the title/caption part of the window (where WM_NCHITTEST returns HTCAPTION) the border will not have the exact color until you release the mouse button. More precisely until a WM_PAINT message is issued and you draw with the correct border color. What seems to be happening is that the DWM knows that the window has been activated and draws the correct border, but your application doesn't receive a WM_PAINT message (it's in the modal loop for size and move, but you'll only get a paint message if you change the size and clicking in the caption only moves the window), and so the border with pre-multiplied alpha is still blended in. A mitigation of the issue is to call InvalidateRect( window, 0, 0 ); in the WM_ENTERSIZEMOVE message to try and get a paint message as soon as possible. It generally takes half a second or so to happen, so if you pay attention you can see the wrong border.
Starting the application with a maximized window
Another detail, not related to the border this time, is that when you start your application maximized, there is an animation where the DWM will start with a window that doesn't cover the whole screen and animate its size to quickly fill the screen. While discussing the WM_NCCALCSIZE issues with Vjekoslav they pointed out that their window (which was an actual application, as opposed to my test application) seemed to grow too much and then snap to the correct value after the animation. After looking into that, it come to the detail of what the window rectangle and client rectangle look like for maximized application, and how the DWM uses the difference between the two to do... its things.
We saw earlier that we needed to put the top of the client rectangle aligned with the top of the window rectangle, otherwise we got a "fake" caption. Well, when the window is maximized it's not the case. When maximized, you need to remove the resize border from the top of the window as well. If you look at the window rectangle values, you'll see that it extend past the screen bounds on every sides. If you don't remove the resize handle, the animation will move the top of the window too far, before snapping it in position. So you need to remove the resize handle size at the top.
But then you might run into another issue, where you sometimes get a white rectangle at the top of your window, where the resize handle is, during the animation. I get that only when using GDI, otherwise I get what I believe is the clear color of OpenGL (I haven't tried all this with directx). Anyway those pixels should be transparent. The only way I found to achieve the proper result is tho disable NC rendering during the animation, and re-enable it after. If you look at a default window animation when starting maximized, or maximizing it afterward seems do something similar where the border and shadow don't seem to be present. Here is a recording of it with accent color on that should illustrate that during the animation there is no blue border. The compression makes it look like there is blue on the side, but I'm almost certain that it's the blending of the background color with the black on the client rect.
Even if I'm wrong, disabling the NC rendering during startup fixes the issue, and the fix is not necessary afterward. The issue is that there is no way to know when the animation ended, and that it's safe to re-enable. In my test setup I just wait for half a second. If you re-enable it too soon the only issue is that you'll get the wrong animation, if you don't re-enable it, once you restore the window you'll get white NC area with rounded top corners. Another way would be to put it in WM_WINDOWPOSCHANGING but you have to make sure that it's after the initial display of the window. I'll leave that to you, in my test there are generally two initial message to ignore, one during the creation of the window and one caused by ShowWindow. Maybe the first WM_WINDOWPOSCHANGING after you received a WM_WINDOWPOSCHANGED message would be good ?
Maximized window and auto hide task bar
While looking at other peoples code during this "project", I saw several time people removing 1 pixel from their window bottom, to allow "auto hide" taskbar to show up when you move the mouse at the bottom of the screen. Some people also search the position of the task bar to remove the pixel on the correct side.
First thing is the task bar "peek" is 2 pixel and their could be additional "app bars". I don't know what they look like or if they are on the same edge as the task bar... But it doesn't matter. Also if you look at a standard maximized window, it covers the entire screen, and the two bottom pixels are covered by the taskbar.
While looking at Firefox source code I saw that there is a property you can set on your window to indicates to Windows (or the DWM) that even if your application covers the screen, like a maximized window with auto hide taskbar enabled, it should keep the task bar above it. The property isn't well documented (or I didn't find it). It's mentioned in the remarks for ITaskbarList2::MarkFullscreenWindow and in a Old new thing blog post.
SetPropW( window, L"NonRudeHWND", ( HANDLE ) TRUE );
With that property set you don't need to change the size of your client area for the taskbar to work.
Window styles for fullscreen window
It's not entirely related but a common method I've seen to create a fullscreen window is to modify the window style from WS_OVERLAPPEDWINDOW to WS_POPUP or similar modification of the style. I personally would recommend to keep the WS_OVERLAPPEDWINDOW style and use WM_NCCALCSIZE to cover the entire screen. The reason is that some features work because of the style of the window. For example you can't minimize a popup window, you can't snap it to the sides, and sometimes it will stay on top of the taskbar when you <Alt+Tab> to another application. I don't think there is any downside for what I'm proposing. If you know some, please let me know.
It was useful after all (sort of)
Remember the nice API from above ? The one we used to get the accent color. If you want to detect which of light or dark mode is on, you'll need to use it. At least if you want to do as the doc says. And it's not a setting to read, you need to get the foreground color and test to see if it's considered light or dark. Almost nothing was wasted in the making of this article.
Complete example
/* NOTE simon (01/10/25): Compile with
 cl main.c /nologo /Zi /Od user32.lib dwmapi.lib gdi32.lib runtimeobject.lib OpenGL32.lib advapi32.lib
*/

#define COBJMACROS
#define INITGUID
#include <initguid.h>
#include <windows.h>
#include <Windowsx.h>
#include <dwmapi.h>
#include <assert.h>
#include <uxtheme.h>
#include <stdint.h>
#include <math.h>

#include <gl/gl.h>

#include <roapi.h>
#include <windows.ui.viewmanagement.h>


/* NOTE simon (28/09/25):
Starting maximized needs some handling to get a proper animation on startup.
You can change this to 1 to start maximized.
*/

int g_start_maximized = 0;


int g_os_major = 10;
int g_os_minor = 0;
HDC g_device_context = 0;
DWORD g_border_color_active = 0xb2323232;
BOOL g_use_accent = 0;
BOOL g_is_active = 0;


__x_ABI_CWindows_CUI_CViewManagement_CIUISettings* g_settings = 0;
__x_ABI_CWindows_CUI_CViewManagement_CIUISettings3* g_settings_3 = 0;

/* IID___x_ABI_CWindows_CUI_CViewManagement_CIUISettings2 85361600-1c63-4627-bcb13a89e0bc9c55 */
DEFINE_GUID( IID___x_ABI_CWindows_CUI_CViewManagement_CIUISettings2, 0x85361600, 0x1c63, 0x4627, 0xbc, 0xb1, 0x3a, 0x89, 0xe0, 0xbc, 0x9c, 0x55 );
/* IID___x_ABI_CWindows_CUI_CViewManagement_CIUISettings3 3021be4-5254-4781--81945168f7d06d7b */
DEFINE_GUID( IID___x_ABI_CWindows_CUI_CViewManagement_CIUISettings3, 0x3021be4, 0x5254, 0x4781, 0x81, 0x94, 0x51, 0x68, 0xf7, 0xd0, 0x6d, 0x7b );

int is_color_light( __x_ABI_CWindows_CUI_CColor color ) {
    int result = ( ( ( 5 * color.G ) + ( 2 * color.R ) + color.B ) > ( 8 * 128 ) );
    return result;
}

int is_dark_mode( ) {

    __x_ABI_CWindows_CUI_CColor color = { 0 };
    HRESULT result = __x_ABI_CWindows_CUI_CViewManagement_CIUISettings3_GetColorValue( g_settings_3, UIColorType_Foreground, &color );
    assert( result == S_OK );

    int dark_mode = is_color_light( color );
    return dark_mode;
}

/* NOTE simon (01/10/25):
The only thing we still use from this function is if the accent color is enabled or not. Meaning the
value of "ColorPrevalence". */
void get_colors_from_registry( void ) {

    HKEY key = 0;
    LSTATUS status = RegOpenKeyExW( HKEY_CURRENT_USER, L"SOFTWARE\\Microsoft\\Windows\\DWM", 0, KEY_READ, &key );
    assert( status == ERROR_SUCCESS );

    DWORD size = sizeof( DWORD );

    /* NOTE simon (09/09/25):
    ColorizationColor and AccentColor give the same color in differente format (0xAARRGGBB vs
    0xAABBGGRR).
    I use the ColorizationColor because the blending factor is called ColorizationColorBalance.
    It doesn't matter.
    */

    DWORD frame_color = 0;
    status = RegGetValueW( key, 0, L"ColorizationColor", RRF_RT_REG_DWORD, 0, &frame_color, &size );

    DWORD balance = 0;
    status = RegGetValueW( key, 0, L"ColorizationColorBalance", RRF_RT_REG_DWORD, 0, &balance, &size );

    DWORD accent = 0;
    status = RegGetValueW( key, 0, L"AccentColor", RRF_RT_REG_DWORD, 0, &accent, &size );

    /* NOTE simon (28/08/25):
    ColorPrevalance is 1 when the user enabled the windows setting to have border and caption color
    use the accent color.

    Old versions of Windows 10 used:

    L"SOFTWARE\\Microsoft\\Windows\\CurrentVersion\\Themes\\Personalize"

    Instead of

    L"SOFTWARE\\Microsoft\\Windows\\DWM"

    The value is still there on my machine but doesn't change when I modify the windows setting.
    */
    status = RegGetValueW( key, 0, L"ColorPrevalence", RRF_RT_REG_DWORD, 0, &g_use_accent, &size );
    assert( status == ERROR_SUCCESS );

    status = RegCloseKey( key );
    assert( status == ERROR_SUCCESS );

    if ( g_use_accent ) {

        /* NOTE simon (09/09/25): When using the accent color for border, there is no transparency
        in the border. */

        /* NOTE simon (09/09/25):
        I got the blend color from
        https://github.com/res2k/Windows10Colors/blob/master/Windows10Colors/Windows10Colors.cpp
        But latter I tried to figure it out myself. Since this is a simple linear interpolation
        and we know the input color (the accent), the output color (e.g. the color of the border in
        a screenshot of a window) and the blend factor, we can work out the initial blend color.
        My initial test didn't know if I had to round, ceil or floor the values, but the average
        was close to 0xd9 for each channel when testing for every color in the settings.
        */
        DWORD frame_blend_color = 0x00d9d9d9;

        float factor_a = ( ( float ) balance ) / 100.0f;
        float factor_b = ( ( float ) ( 100 - balance ) ) / 100.0f;

        float a_r = ( float ) ( ( frame_color >> 16 ) & 0xff );
        float a_g = ( float) ( ( frame_color >> 8 ) & 0xff );
        float a_b = ( float ) ( frame_color & 0xff );

        float b_r = ( float ) ( ( frame_blend_color >> 16 ) & 0xff );
        float b_g = ( float ) ( ( frame_blend_color >> 8 ) & 0xff );
        float b_b = ( float ) ( frame_blend_color & 0xff );

        /* NOTE simon (09/09/25 13:49:54): Round, not floor or ceil to get the exact result when
        back in integers. */
        int r = ( int ) roundf( a_r * factor_a + b_r * factor_b );
        int g = ( int ) roundf( a_g * factor_a + b_g * factor_b );
        int b = ( int ) roundf( a_b * factor_a + b_b * factor_b );

        g_border_color_active = ( b << 16 ) | ( g << 8 ) | ( r );

    } else {

        /* NOTE simon (01/10/25): This isn't a good color. */
        g_border_color_active = 0xb2323232;
    }
}

void gl_draw_rect( HWND window, RECT rect, float r, float g, float b, float a ) {

    RECT client = { 0 };
    GetClientRect( window, &client );

    float width = ( float ) ( client.right - client.left );
    float height = ( float ) ( client.bottom - client.top );

    float left = ( ( rect.left * 2.0f ) / width ) - 1.0f;
    float right = ( ( rect.right * 2.0f ) / width ) - 1.0f;
    float top = ( ( ( height - rect.top ) * 2.0f ) / height ) - 1.0f;
    float bottom = ( ( ( height - rect.bottom ) * 2.0f ) / height ) - 1.0f;

    glBegin( GL_TRIANGLES ); {
        glColor4f( r, g, b, a );
        glVertex2f( left, bottom );
        glVertex2f( right, bottom );
        glVertex2f( left, top );
        glVertex2f( left, top );
        glVertex2f( right, bottom );
        glVertex2f( right, top );
    } glEnd( );
}

void draw_user_content( HWND window, RECT rect ) {

    /* NOTE simon (01/10/25): This is where you can draw the content of the window, using "rect".
    rect is the actual region you can draw in, to not overwrite the top border.
    */
    RECT title = rect;
    title.bottom = title.top + 50;
    gl_draw_rect( window, title, 0.3f, 0.3f, 0.7f, 1.0f );
}

void render( HWND window, RECT client ) {

    glViewport( 0, 0, client.right - client.left, client.bottom - client.top );

    glClearColor( 0, 0, 0, 1 );
    glClearDepth( 1 );
    glClear( GL_COLOR_BUFFER_BIT | GL_DEPTH_BUFFER_BIT );

    /* NOTE simon (01/10/25): Draw the border and adjust the rectangle if necessary. */
    if ( g_os_major == 10 && !IsZoomed( window ) ) {

        float gray = roundf( 85.0f * 0.5f ) / 255.0f;

        if ( g_is_active ) {
            gl_draw_rect( window, ( RECT ) { client.left, 0, client.right, 1 }, 0, 0, 0, 0.0f );
        } else {
            gl_draw_rect( window, ( RECT ) { client.left, 0, client.right, 1 }, gray, gray, gray, 0.5f );
        }

        client.top += 1;
    }

    draw_user_content( window, client );

    SwapBuffers( g_device_context );
}

BOOL rect_contains_point( RECT rect, POINT point ) {
    BOOL result = ( rect.left <= point.x && rect.right >= point.x && rect.top <= point.y && rect.bottom >= point.y );
    return result;
}

LRESULT CALLBACK window_proc( HWND window, UINT message, WPARAM wParam, LPARAM lParam ) {

    LRESULT result = 0;

    switch( message ) {

        case WM_ENTERSIZEMOVE: {
            /* NOTE simon (27/09/25): To ask for a draw while in the modal move loop.
            If we don't do that the border will be slightly off until we exit the loop.
            With this it will be slightly off for a half a second. */
            InvalidateRect( window, 0, 0 );
            DefWindowProcW( window, message, wParam, lParam );
        } break;

        case WM_SETFOCUS: {
            g_is_active = 1;
        } break;

        case WM_KILLFOCUS: {
            g_is_active = 0;
        } break;

        case WM_DWMCOLORIZATIONCOLORCHANGED: {
            /* NOTE simon (01/10/25):
            This message wParam gives a color related to the accent color. It's not realy useful.
            But we can use this message to know when a color setting changed.
            For example changing the accent color, dark/light mode change, enable/disable accent
            color.
            We will receive this message several times with the same parameters when a setting
            change.
            */
            get_colors_from_registry( );

#if 0
            /* NOTE simon (01/10/25):
            If you want to change the dark/light mode, this is how to do it.
            */
            if ( is_dark_mode( ) ) {
                BOOL value = TRUE;
                DwmSetWindowAttribute( window, DWMWA_USE_IMMERSIVE_DARK_MODE, &value, sizeof( value ) );
            } else {
                BOOL value = FALSE;
                DwmSetWindowAttribute( window, DWMWA_USE_IMMERSIVE_DARK_MODE, &value, sizeof( value ) );
            }
#endif

        } break;

        case WM_NCCALCSIZE: {

            /* NOTE simon (27/09/25): Need  to handle DPI settings. GetSystemMetricsForDpi */
            int padding = GetSystemMetrics( SM_CXPADDEDBORDER );
            int borderLR = GetSystemMetrics( SM_CXFRAME ) + padding;
            int borderTB = GetSystemMetrics( SM_CYFRAME ) + padding;

            RECT* rect = 0;

            if ( wParam ) {
                rect = ( ( NCCALCSIZE_PARAMS* ) lParam )->rgrc;
            } else {
                rect = ( RECT* ) lParam;
            }

            rect->left += borderLR;
            rect->right -= borderLR;
            rect->bottom -= borderTB;

            if ( IsZoomed( window ) ) {
                rect->top += borderTB;
            }

        } break;

        case WM_NCHITTEST: {

            POINT point = { 0 };
            point.x = GET_X_LPARAM( lParam );
            point.y = GET_Y_LPARAM( lParam );
            ScreenToClient( window, &point );

            RECT rect = { 0 };
            GetClientRect( window, &rect );

            int padding = GetSystemMetrics( SM_CXPADDEDBORDER );
            int x_frame = GetSystemMetrics( SM_CXFRAME );
            int y_frame = GetSystemMetrics( SM_CYFRAME );

            RECT top_handle = rect;
            top_handle.bottom = rect.top + ( y_frame + padding );

            RECT top_left_handle = rect;
            top_left_handle.right = top_left_handle.left + ( x_frame + padding );
            top_left_handle.left -= ( x_frame + padding );
            top_left_handle.bottom = top_left_handle.top + ( y_frame + padding );

            RECT top_right_handle = rect;
            top_right_handle.left = top_right_handle.right - ( x_frame + padding );
            top_right_handle.right += ( x_frame + padding );
            top_right_handle.bottom = top_right_handle.top + ( y_frame + padding );

            /* NOTE simon (01/10/25): We only need to manually hande the top, top left corner and
            top right corner. The rest will be handled by the default procedure. */
            BOOL top = rect_contains_point( top_handle, point );
            BOOL top_left = rect_contains_point( top_left_handle, point );
            BOOL top_right = rect_contains_point( top_right_handle, point );

            /* NOTE simon (01/10/25): This rect is "a title bar" to allow to drag the window
            arround. */
            RECT drag = rect;
            drag.bottom = drag.top + 50;

            if ( top_left ) {
                result = HTTOPLEFT;
            } else if ( top_right ) {
                result = HTTOPRIGHT;
            } else if ( top ) {
                result = HTTOP;
            } else if ( rect_contains_point( drag, point ) ){
                result = HTCAPTION;
            } else {
                result = DefWindowProcW( window, message, wParam, lParam );
            }

        } break;

        case WM_PAINT: {

            RECT client = { 0 };
            GetClientRect( window, &client );

            render( window, client );

            /* NOTE simon (27/09/25): ValidateRect or Begin/End paint to validate the rectangle,
            otherwise we get more paint messages. */
            ValidateRect( window, &client );

        } break;

        case WM_DESTROY: {
            PostQuitMessage( 0 );
        } break;

        default: {
            result = DefWindowProcW( window, message,  wParam, lParam );
        } break;
    }

    return result;
}

void get_windows_version( int* major, int* minor ) {
    uint8_t* SharedUserData = ( uint8_t* ) 0x7ffe0000;
    *major = *( int* ) ( SharedUserData + 0x026c );
    *minor = *( int* ) ( SharedUserData + 0x0270 );
}

int wWinMain( HINSTANCE hInstance, HINSTANCE hPrevInstance, PWSTR pCmdLine, int nCmdShow ) {

    get_windows_version( &g_os_major, &g_os_minor );
    get_colors_from_registry( );

    HRESULT result = RoInitialize( RO_INIT_SINGLETHREADED );
    assert( result == S_OK );

    HSTRING_HEADER header = { 0 };
    HSTRING hstring = { 0 };

    /* NOTE simon (09/09/25): Use the default interface and then query the other version from it. */
    result = WindowsCreateStringReference( RuntimeClass_Windows_UI_ViewManagement_UISettings,
                                          wcslen( RuntimeClass_Windows_UI_ViewManagement_UISettings ), &header, &hstring );
    assert( result == S_OK );

    result = RoActivateInstance( hstring, ( IInspectable** ) &g_settings );
    assert( result == S_OK );

    result = IInspectable_QueryInterface( g_settings, &IID___x_ABI_CWindows_CUI_CViewManagement_CIUISettings3, &g_settings_3 );
    assert( result == S_OK );

    WNDCLASSW window_class = {
        .lpfnWndProc = window_proc,
        .lpszClassName = L"simple_window",
        .hCursor = LoadCursorW( 0, ( LPCWSTR ) IDC_ARROW ),
        /* NOTE simon (11/09/25): This should guarantee the background color of the window on the
        first frame is black. */
        .hbrBackground = GetStockObject( BLACK_BRUSH ),
    };

    RegisterClassW( &window_class );

    int window_style = WS_OVERLAPPEDWINDOW;
    int x = 300;
    int y = 300;
    int width = 200;
    int height = 200;

    HWND window = CreateWindowExW( 0, window_class.lpszClassName, L"Custom border", window_style, x, y, width, height, 0, 0, 0, 0 );

#if 0
    /* NOTE simon (01/10/25): If you want to properly set the dark or light mode on startup.
    But this will give you the white border bug.
    */
    if ( is_dark_mode( ) ) {
        BOOL value = TRUE;
        DwmSetWindowAttribute( window, DWMWA_USE_IMMERSIVE_DARK_MODE, &value, sizeof( value ) );
    } else {
        BOOL value = FALSE;
        DwmSetWindowAttribute( window, DWMWA_USE_IMMERSIVE_DARK_MODE, &value, sizeof( value ) );
    }

#else

    /* NOTE simon (01/10/25): Always use dark mode when doing custom title bar. */
    BOOL value = TRUE;
    DwmSetWindowAttribute( window, DWMWA_USE_IMMERSIVE_DARK_MODE, &value, sizeof( value ) );
#endif

    DwmExtendFrameIntoClientArea( window, &( MARGINS ) { 0, 0, 1, 0 } );

    /* NOTE simon (09/09/25): Keep auto hide taskbar on top of maximized windows.
    https://learn.microsoft.com/en-us/windows/win32/api/shobjidl_core/nf-shobjidl_core-itaskbarlist2-markfullscreenwindow
    https://devblogs.microsoft.com/oldnewthing/20250522-00/?p=111211
    */
    SetPropW( window, L"NonRudeHWND", ( HANDLE ) TRUE );

    /* NOTE simon (01/10/25): Legacy OpenGL context for simple tests. */
    PIXELFORMATDESCRIPTOR pfd = {
        .nSize = sizeof( PIXELFORMATDESCRIPTOR ),
        .nVersion = 1,
        .dwFlags = PFD_DRAW_TO_WINDOW | PFD_SUPPORT_OPENGL | PFD_DOUBLEBUFFER,
        .iPixelType = PFD_TYPE_RGBA,
        .cColorBits = 32,
        .cDepthBits = 24,
        .cStencilBits = 8,
        .iLayerType = PFD_MAIN_PLANE,
    };

    g_device_context = GetDC( window );
    int default_pixel_format = ChoosePixelFormat( g_device_context, &pfd );
    SetPixelFormat( g_device_context, default_pixel_format, &pfd );
    HGLRC gl_context = wglCreateContext( g_device_context );
    wglMakeCurrent( g_device_context, gl_context );

    if ( g_start_maximized ) {
        int value = DWMNCRP_DISABLED;
        DwmSetWindowAttribute( window, DWMWA_NCRENDERING_POLICY, &value, sizeof( value ) );
    }

    /* NOTE simon (01/10/25): Timer to re-enable NCRENDERING.
    There is probably a better way than using a timer.
    Something like doing it in WM_WINDOWPOSCHANGING, but not the first two of those messages. */
    uint64_t frequency = 0;
    QueryPerformanceFrequency( ( LARGE_INTEGER* ) &frequency );
    uint64_t time = 0;
    QueryPerformanceCounter( ( LARGE_INTEGER* ) &time );

    if ( g_start_maximized ) {
        ShowWindow( window, SW_MAXIMIZE );
    } else {
        ShowWindow( window, SW_SHOW );
    }

    MSG message = { 0 };

    while ( GetMessageW( &message, 0, 0, 0 ) ) {

        if ( g_start_maximized ) {

            /* NOTE simon (01/10/25): We need to re-enable NC rendering after the maximize
            animation. */
            uint64_t now = 0;
            QueryPerformanceCounter( ( LARGE_INTEGER* ) &now );

            uint64_t elapsed = now - time;
            double elapsed_double = ( double ) elapsed / ( double ) frequency;

            if ( elapsed_double > 0.5 ) {
                g_start_maximized = 0;
                int val = DWMNCRP_ENABLED; // DWMNCRP_USEWINDOWSTYLE ?
                DwmSetWindowAttribute( window, DWMWA_NCRENDERING_POLICY, &val, sizeof( val ) );
            }
        }

        if ( message.message == WM_QUIT ) {
            break;
        }

        TranslateMessage( &message );
        DispatchMessageW( &message );

        RECT client = { 0 };
        GetClientRect( window, &client );

        render( window, client );
    }

    return 0;
}
List of accent colors and corresponding border colors
They are in the same order as the settings window. The first column is the accent color in the settings, the second column is the corresponding border color.
ffb900 means R = ff, G = b9, B = 00.
ffb900 fbbd18
ff8c00 fb9418
f7630c f47023
ca5010 cc5f26
da3b01 da4c19
ef6950 ed755f
d13438 d2464a
ff4343 fb5454
e74856 e55864
e81123 e62737
ea005e e8186c
c30052 c51861
e3008c e21894
bf0077 c21882
c239b3 c54bb7
9a0089 a11892
0078d7 1883d7
0063b1 1870b5
8e8cd8 9694d8
6b69d6 7775d6
8764b8 9071bc
744da9 7f5cae
b146c2 b556c5
881798 912c9f
0099bc 18a0bf
2d7d9a 4087a1
00b7c3 18bbc5
038387 1b8c90
00b294 18b69c
018574 198e7f
00cc6a 18cd76
10893e 26924f
7a7574 84807f
5d5a58 6b6866
68768a 748193
515c6b 606a77
567c73 64867e
486860 58746d
498205 598c1c
107c10 268626
767676 818181
4c4a48 5c5a58
69797e 758488
4a5459 5a6367
647c64 718671
525e54 616c63
847545 8d8055
7e735f 887e6c
Edited by Simon Anciaux
on
Reason: Fixed several typos, change some wording